


Blog

Updated 19 August 2026
Your Step-by-Step Guide to Installing S-Fold Curtains
The S-Fold curtain is your answer to effortless luxury. Hung from a slim, discreet track, these curtains hold their signature ‘S’ wave shape whether they’re drawn closed or thrown wide open. They pool beautifully, glide like a dream, and instantly polish any room. Best of all, you don't need a professional installer to get the look.
Installing your own S-fold curtain track is a rewarding DIY project that can completely transform a room. This guide will walk you through the entire process, from unboxing to hanging, so you can achieve a professional look with confidence.
A successful installation starts with a little preparation. Before you get started, make sure you have the right tools on hand and have checked your hardware.
Tools You'll Need:
This is the most important step for getting that perfect curtain drop. Always install your track first before measuring for custom curtains.
Step 1: Choose Your Mount and Position
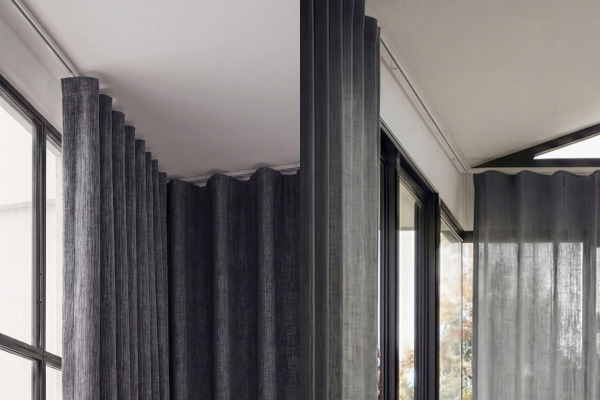
First, decide how you want to hang your track. The system includes brackets for both wall and ceiling mounting. Your choice may depend on your ceiling height and the style you're after.
Ceiling Mount vs. Wall Mount: Which is right for you?
Next, decide on the track's position:
Step 2: Mark Your Bracket Positions
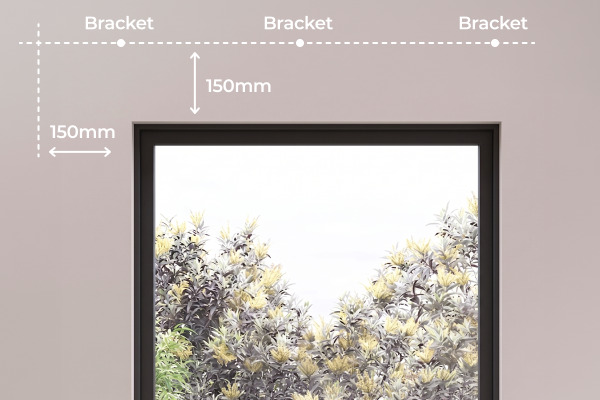
Using your pencil and tape measure, mark where the brackets will go.
Once you're happy with your markings, use your drill to create pilot holes. If you're drilling into brick or masonry, use the provided masonry plugs. For timber walls or window frames, you won't need the plugs.
What’s a pilot hole? A pilot hole is a small, preliminary hole you drill into the wall or stud before you drive in your main screw.
Think of it as a guide hole that clears the path.
Now, use your Phillips head screwdriver to securely attach the brackets to the wall or ceiling with the provided screws.
Step 4: Installing the track into the brackets
4a. Reversing the stack direction (optional)
Complete this step before mounting the track to the ceiling.
4b. Installing the track into brackets
4c. For longer tracks (>1800mm): Your track comes in two pieces with a joiner. Simply connect the two pieces using the joiner.
With the track installed, you're on the home stretch!
Step 1: Prepare Your Curtains
Our custom curtain and track sets come complete with the hooks preassembled for your convenience.
Step 2: Hang and Adjust Your Curtains
This part is easier with two people—one to hold the curtain's weight and one to attach it to the track.
Installing your own S-fold curtain track is a rewarding DIY project that can completely transform a room. This guide will walk you through the entire process, from unboxing to hanging, so you can achieve a professional look with confidence.
Before You Begin: Get Prepared
A successful installation starts with a little preparation. Before you get started, make sure you have the right tools on hand and have checked your hardware.
Tools You'll Need:
- Screwdriver
- Drill
- Pencil
- Tape Measure
- Level
- A sturdy ladder
Quick Safety Check
- Check your wall: ensure the wall or ceiling you're drilling into can support the combined weight of the track and your new curtains. Brackets must be fixed into timber studs, brick, or other solid material. A stud finder is your best friend here!
- Handle with care: Some components can be sharp. It's a good idea to wear covered footwear during installation.
- Keep parts away from children.
Part 1: Installing the S-Fold Track
This is the most important step for getting that perfect curtain drop. Always install your track first before measuring for custom curtains.
Step 1: Choose Your Mount and Position
First, decide how you want to hang your track. The system includes brackets for both wall and ceiling mounting. Your choice may depend on your ceiling height and the style you're after.Ceiling Mount vs. Wall Mount: Which is right for you?
- Go for a ceiling mount if: You want to make your ceilings feel higher. Fixing the track to the ceiling creates a seamless, floor-to-ceiling waterfall of fabric that’s incredibly modern and creates the illusion of space (perfect for lower or average-height rooms).
- Go for a wall mount if: You want a more classic, framed look, or if you have a crown moulding that you don't want to block. Typically placed 10 to 15cm above the window frame, a wall mount keeps spaces with already-high ceilings feeling grounded, proportional, and beautifully styled.
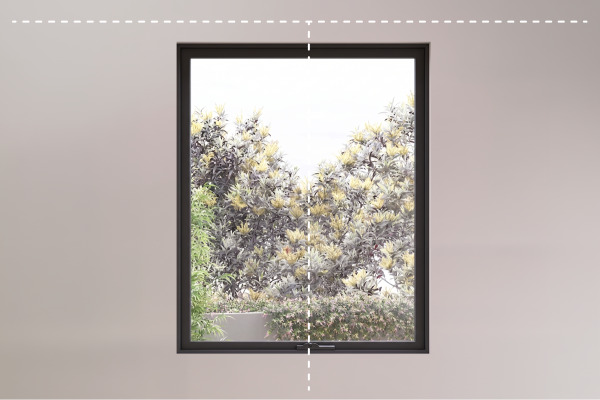
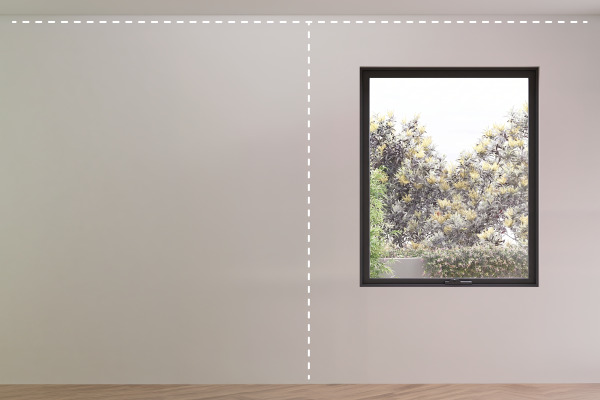
Next, decide on the track's position:
- Centred on the window: If your window is in the middle of a wall, centre the track over the window. We recommend extending the track at least 150mm past the frame on each side to ensure the curtains clear the window when open.
- Centred on the wall: If your window is off-centre, or you want to create a sense of grandeur, centre the track along the entire wall. This is a great way to create a feature wall or conceal an asymmetrical window.
Step 2: Mark Your Bracket Positions
Using your pencil and tape measure, mark where the brackets will go.
- Start by marking the position for the first bracket 10-15cm in from where the track will end.
- Repeat for the other end.
- Space the remaining brackets evenly between the two ends to ensure the curtain's weight is fully supported. Use a level to make sure your markings are perfectly straight. This is crucial for smooth operation.
Step 3: Drill Pilot Holes and Secure the Brackets
Once you're happy with your markings, use your drill to create pilot holes. If you're drilling into brick or masonry, use the provided masonry plugs. For timber walls or window frames, you won't need the plugs.
What’s a pilot hole? A pilot hole is a small, preliminary hole you drill into the wall or stud before you drive in your main screw.
Think of it as a guide hole that clears the path.
Now, use your Phillips head screwdriver to securely attach the brackets to the wall or ceiling with the provided screws.
Step 4: Installing the track into the brackets
Understanding the ‘stack’
The ‘stack’ is the side of the window where the fabric bunches when the curtains are open.- Left Stack (standard): Our tracks are pre-configured for a Left Stack. If you’re happy with this, skip to section 4b.
- Right Stack (optional): If you prefer a Right Stack, complete section 4a now while the track is on the ground.
4a. Reversing the stack direction (optional)
Complete this step before mounting the track to the ceiling.
- Open the left end: Unscrew the end cap on the left side.
- Release the end stop: Loosen and remove the small metal/plastic block (the end stop’) located behind the last glider.
- Close the left end: Screw the end cap back on.
- Open the right end: Unscrew the end cap on the right side.
- Set the new end stop: Slide out the first glider, insert the end stop, then slide the glider back in so it sits between the end stop and the cap.
- Secure: Screw the end cap back on. Your track is now a Right Stack.
4b. Installing the track into brackets
- Slightly loosen the small screw on the plastic holder of each bracket.
- Gently push the track into the plastic holders until it clicks into place.
4c. For longer tracks (>1800mm): Your track comes in two pieces with a joiner. Simply connect the two pieces using the joiner.
Part 2: Hanging Your Curtains
With the track installed, you're on the home stretch!
Step 1: Prepare Your Curtains
Our custom curtain and track sets come complete with the hooks preassembled for your convenience.Step 2: Hang and Adjust Your Curtains
This part is easier with two people—one to hold the curtain's weight and one to attach it to the track.- Starting from one of the fixed ends of the track, insert the pointed end of a curtain hook into the hole on a track carrier.
- Continue along the track, inserting each hook into the next available carrier until the curtain is fully hung.
- Once hung, step back and adjust the folds. Gently guide the fabric to create a series of perfect, evenly spaced waves. Ensure the pendants at the bottom of the curtain are facing each other for that flawless, professional finish.
Explore More



Payment options





Head Office (No Showroom)
2/1-7 Unwins Bridge Rd, St Peters,
NSW 2044, Australia
Your customer reference #:
01-X-CSN